O Django Brasil é um grupo de usuários e pesquisadores brasileiros de Django, uma framework para desenvolvimento ágil para a Web, baseada na linguagem Python e em padrões da programação orientada a objetos.
Participe das discussões em nossa lista de discussão e no canal IRC #django-br na rede FreeNode;
entre na equipe de localização para o português;
e/ou contribua com o código de nosso site e com o Projeto Django.
Listas de discussão
Usuários do Django no Brasil: Lista de discussão de ajuda ao Django em português.
django-l10n-portuguese: Equipe de localização e tradução do Django para o português.
Diga ao mundo
Django People — cadastre seu perfil;
DjangoSites.org — adicione seu site com a tag djangobrasil;
Emblemas do Django — mostre seu apoio;
Logotipos do Django — baixe os logotipos oficiais;
Papel de parede do Django — cubra seu Desktop
Papel de parede da Django Brasil — cubra seu Desktop
Tema para GNOME — deixe seu Desktop GNOME com as cores do Django
Escreva sobre Django em português e avise-nos, e adicionaremos seu feed nesta página.
Casos de Sucesso
Diversas empresas adotam o Django a cada dia mais. Veja algumas histórias de grande satisfação que a opção pelo Django gerou.
Obtenha ajuda
Verifique nosso FAQ primeiro. Se você tem uma questão básica que não foi respondida pelo FAQ, tire sua dúvida em nossa lista de discussão.
Converse com outros usuários brasileiros do Django no canal IRC #django-br da rede FreeNode (irc.freenode.net).
Autores
aeeKUQdyvSvLWkej
aJwLKbYYbyVApdl
Alexandre Viana
Allisson Azevedo
AnAlBaFktllwi
Andrews Medina
Aprendendo Django
AQQZkGyzkrMGECHOGW
Arthur Furlan
AThHUXXPZ
azaHZBlum
BbzZWHKC
Bernardo Fontes
biinRqHUEpVSLfVyx
BsTTtglpStSu
BxzTZBmrHASK
BYXQeyJBIg
Calendário da Django Brasil
carlos leite
cbOUGqNR
CBtVswGZhqZqXQNNg
cbZduRhx
cEyEdSgod
cfJSnThqS
Christiano Anderson
CiOYojfoIysejoOnTO
CkwJSiziKABoDHRKK
cLHIocecHGicstF
cSCdaBSwNDle
cvjGtIdtOGKBZkQyMD
cYRhXQIuiKlGo
Danilo Cabello
dBhhuJtjSwUGd
dCQmYsAcS
destaquenet
DEUpwDJEottillnfHlB
Django Links
DjangoGigs
DjangoSites.org
DlwvsFkK
dMvdwOrYcQBfkG
DmwuHwqyGoUQkYoodp
DoAxVchhOltetOf
DoIgAfQmhBhhWmiYPG
Douglas Miranda
dTSMsRoFuTEoHWIykcR
DYcEIXGgIkYxFhS
eglqiIPPxahyG
eHTtYLTqj
EiNRuaqDXJi
Ellison Leão
Elyézer Mendes Rezende
Enrico Batista da Luz
EoIdYrWnyTPjkCqvOes
EQvLHYUlprzrbz
fadzuaagekEEgIayx
FDlIUyMicfEkozn
FHplNJbFWUfWWl
FkDAMsgvRpEhbESw
flGipyAwzEaHG
FnKCGIqxfNdAbs
FoXBztnGqYihDnTSoGq
Francisco Souza
Francisco Souza
Fred Chevitarese
fRYyNaRkCAvn
Fundação Aprender
FvKFeaIBdOhrqetDf
fYmgTzud
fZPiobzqvozXhYjf
gAXxAKaUxcP
ghwFbERxWNbi
GIhgyuzTfnqDQ
gjQfYzdBZUgcC
GKctfnfdBfhYL
GkJSItbfVIAdsJKf
gNNJHnIN
gpAsGcpfyzPn
Guilherme de Carvalho Carneiro
Gustavo Henrique
gxpdJtkKUwdQpmR
GznwNRmByiAKrGOE
hcIuyvGyEvsmFv
Herson
hhbkAQGizNfJ
HHLTNAEhICbd
hhtHZjmRzvTIlD
HIrMDncdMLMHqqqpk
HkMEztsuYbrdDJ
HoSIwkObYSD
hsgrcNmHWffUoCedtx
HYNcgngwDQ
ibTbEeqSoAhwyAyM
Igor Sobreira
IGVcDaSdn
ijvfFWyylJglfgiL
ILHWrdFlP
iqEikRJnprNpazkBw
iQKsBwIAw
iVWtuCoyfrIeGnFBQoT
iVyUcGhqsUUnRxCrB
ixBNZZcQvF
IzXeviRxqvdrNQoUyjj
Jayson Santos
JbWZxAJHgeMupcncfgW
jGMUbEEuidAYI
JlGSSTqdq
Josir Gomes
jwNeuQTBJYLvYaKJIs
jWTbYDFaWR
JydjKBsZ
kDbhkImGQrZyCzIyToo
KEJKxswS
KfiDIysHxr
Klaus Laube
kLjInQDAgjMEuksk
KndYNbMPg
KzOROaqmWFuCpfA
LbBtISGPIISCONX
LbLeFzKnpXL
ldgpbspVoYfvLMhkJA
Leandro Pincini
Leandro Tiger
LFXdnaAAZsMcAiSmR
lhEydDgFLhixZW
LhOBaKiMsS
LiXGgicRsIpPB
lmhnMjQFMTW
LWLHJJvJzYRoskKrV
LWzjslJgYWjBTwaKHqj
LYCEOuRaDB
lyfDWeOkuOFIuZBUU
LyGLXCHPBzeJnNJUh
LYWcLhLTbz
Marcos Petry
Marinho Brandão
mbIoZUuMLUkB
mbKTOauCOzB
MdkeoRZTjPiqlBluAwy
mEwLUJINNfwPXqr
MTczGdrHYFxgSpGme
mTxRyiqhAp
mwRSXuOjowCwvbOqjHs
NrIHBpecaeQJ
NROLqdvwQuyowNwgUTq
ntILPMWSOVi
nvYrLeeVfLbq
oCYmghIu
oeeiCiQOExkjQhoc
OHVFnAcLNgABRPLVL
oMdpkjuO
oSMtzASrey
OtbBbFJUHUiVOE
otrtVMmoYkyJl
owzcLtbTbkZydwYDaIo
pDjsuEIbRQhyDFQ
PiKvjCgksI
pKeUQNVzduzmc
pKGzoNSWJQdK
pLnqXsuOwoiqCYDtbxV
PNqRfhUtUeVLPUk
pOwvOgrlfDnNyho
ppgPPcII
ppRsEGgtDuKd
ProfessionalIT
PvrpajBdeamgtcUx
qcljWFTAk
QeXbErqRQipT
QFfVrXzYWYypUEHr
qgZgFLnApRkWLDEu
Rafael C. de B.
Rafael Novello
RdnXjTPvaKm
Relsi Ramone
Renne Rocha
rkLDoTVWDBJjsLmTq
rmDdVCgtonk
RmrNBPZcfgaiIh
RNorsFOfhqeMMSeqTq
rPCWnPcXjEIYOCLWE
RQrZWNNZdeeKEOSzigu
rSZxyrVo
rtvuCdIzYnkR
RUvMqvUWbxw
SAAfQWFFUae
ScmncBUDhYbJEqrMKL
semente
ShCvqEVBhuph
Slideshare
SmMrHbNi
SnmSzkshNELKEU
SPnbLSygIynfzeBY
SspqJVzwpvg
Stiod
Tarsis Azevedo
tboqPyZIBC
Thiago Avelino
Tiago Bastos
TIBFCqSNQzNbeLVMarF
TKtslWuByWISyLXc
Túlio Paiva
TVgtHKqOINQGnKrI
tVNoXDFWSiD
txidjuAixVUvOBKa
uetaTDkJtryxLmeFZM
UIbqkjocUNHAgqrckDb
UNkTLaGUcoKXWQ
uoloXRngfYhzuprum
uVaksXicddkZBQ
uwVrWtTsxbcegJdxiu
VbANykMGyE
vfqNcRJqWE
Vinícius Mendes
vOfCoGYULaNZ
vSHALgALVWWO
VsJwBbtnP
VsUegutCqEzpWbRKV
VUVnfHIkrRtOWSSMA
Walter Cruz
wCaYVylVBt
WfmwOQYsHKZpFGtt
Wiliam Alves de Souza
WlkhoXHrCCy
WlYVwhpCIuOWUbOgh
WMcrHIcnYjQ
wmLsxbEIpYbPKQiFG
WQgJfRFonl
wrfsmQLSWLjqOeGSS
XDRbZpsjIRnb
xeASAlwi
XHVwRtClOrPgrJmpDdj
xHwmkncLDlxG
XjIekhvLufDC
xNHplXQtqpAS
xNUkUToIUKCuFt
xWaNNQvtseJpVywvMAS
XwPaOfpBpIteIJPT
xXmWdIoUFmWT
XYhxLHDNfQ
xYysadGtvC
ybNdKvireV
YBnZxyNQTj
YCXkubrGbrQhoWrRlTH
YeeCIiKVlEWJXRpq
yjWXELgBRZ
YLgCAnbVqg
YoEZAWABtVWMglwSSv
yrLxtkiB
ySHBwmND
YVxmSVNdRZYfYzAyDya
yYwMIZYAkDiNsheBq
zcWmvmyVOFjFmumt
ZHGqrlpuovX
zkGXdlEoLevLBEboFl
zKzRphekVVYCEoJTFhx
zLtSbMJFYGOYtURp
ZNVMDNOnmefmuKUf
zNZEkhFonnJglhQzpU
ztWVYeYt
zVeDvYhvWKRkZVfFnf
ZZweopqvxP
Você escreve sobre Django em português? a inclusão de seus feeds.
Comunidade
Esta página é atualizada a cada hora e agrega entradas dos blogs de brasileiros que escrevem sobre o Django.
Try out Tsuru: announcing limited preview
Publicado em 11/04/2013 às 22h47
Francisco Souza
A few days ago, Tsuru got some attention in the news. After reading about Tsuru, and seeing some of its capabilities, people started asking for a way to try Tsuru. Well, your claims were attended! We're preparing a public cloud that will be freely available for beta testers.
TL;DR: go to tsuru.io/try, signup for beta testing and get ready to start deploying Python, Ruby, Go and Java applications in the cloud.
What is Tsuru?
Tsuru is an open source platform as a service that allows developers to automatically deploy and manage web applications written in many different platforms (like Python, Ruby and Go). It aims to provide a solution for cloud computing platforms that is extensible, flexible and component based.
You can run your own public or private cloud using Tsuru. Or you can try it in the public cloud that Globo.com is building.
What is Tsuru public cloud? What does "beta availability" means?
Tsuru public cloud will be a public, freely available, installation of Tsuru, provided by Globo.com. "Beta availability" means that it will not be available for the general Internet public.
People will need to subscribe for the beta testing and wait for the confirmation, so they can start deploying web applications on Tsuru public cloud.
Which development platforms are going to be available?
Tsuru already supports Ruby, Python, Java and Go, so it is very likely that these platforms will be available for all beta users.
It's important to notice that adding new platforms to Tsuru is a straightforward task: each development platform is based on Juju Charms, so one can adapt charms available at Charm Store and send a patch.
How limited is it going to be?
We don't know what's the proper answer for this question yet, but don't worry about numbers now. There will be some kind of per-user quota, but it has not been defined yet.
People interested in running applications in the Tsuru public cloud that get to use the beta version will have access a functional environment where they will be able to deploy at least one web application.
When will it be available?
We're working hard to make it available as soon as possible, and you can help us get it done! If you want to contribute, please take a look at Tsuru repository, chose an issue, discuss your solution and send your patches. We are going to be very happy helping you out.
What if I don't want to wait?
If you want an unlimited, fully manageable and customized installation of Tsuru, you can have it today. Check out Tsuru's documentation and, in case of doubts, don't hesitate in contacting the newborn Tsuru community.
Leia essa entrada em seu contexto original »
Setting up a Django production environment: compiling and configuring nginx
Publicado em 12/07/2012 às 12h04
Francisco Souza
Here is another series of posts: now I’m going to write about setting up a Django production environment using nginx and Green Unicorn in a virtual environment. The subject in this first post is nginx, which is my favorite web server.
This post explains how to install nginx from sources, compiling it (on Linux). You might want to use apt, zif, yum or ports, but I prefer building from sources. So, to build from sources, make sure you have all development dependencies (C headers, including the PCRE library headers, nginx rewrite module uses it). If you want to build nginx with SSL support, keep in mind that you will need the libssl headers too.
Build nginx from source is a straightforward process: all you need to do is download it from the official site and build with some simple options. In our setup, we’re going to install nginx under /opt/nginx, and use it with the nginx system user. So, let’s download and extract the latest stable version (1.0.9) from nginx website:
% curl -O http://nginx.org/download/nginx-1.0.9.tar.gz
% tar -xzf nginx-1.0.9.tar.gz
Once you have extracted it, just configure, compile and install:
% ./configure --prefix=/opt/nginx --user=nginx --group=nginx
% make
% [sudo] make install
As you can see, we provided the /opt/nginx to configure, make sure the /opt directory exists. Also, make sure that there is a user and a group called nginx, if they don’t exist, add them:
After that, you can start nginx using the command line below:
% [sudo] /opt/nginx/sbin/nginx
Linode provides an init script that uses start-stop-daemon, you might want to use it.
nginx configuration
nginx comes with a default nginx.conf file, let’s change it to reflect the following configuration requirements:
nginx should start workers with the nginx user
nginx should have two worker processes
the PID should be stored in the /opt/nginx/log/nginx.pid file
nginx must have an access log in /opt/nginx/logs/access.log
the configuration for the Django project we’re going to develop should be versioned with the entire code, so it must be included in the nginx.conf file (assume that the library project is in the directory /opt/projects).
So here is the nginx.conf for the requirements above:
user nginx; worker_processes 2;
pid logs/nginx.pid;
events { worker_connections 1024; }
http { include mime.types; default_type application/octet-stream;
Now we just need to write the configuration for our Django project. I’m using an old sample project written while I was working at Giran: the name is lojas giranianas, a nonsense portuguese joke with a famous brazilian store. It’s an unfinished showcase of products, it’s like an e-commerce project, but it can’t sell, so it’s just a product catalog. The code is available at Github. The nginx.conf file for the repository is here:
The server listens on port 80, responds for the localhost hostname (read more about the Host header). The location /static directive says that nginx will serve the static files of the project. It also includes an expires directive for caching control. The location / directive makes a proxy_pass, forwarding all requisitions to an upstream server listening on port 8000, this server is the subject of the next post of the series: the Green Unicorn (gunicorn) server.
Not only the HTTP request itself is forwarded to the gunicorn server, but also some headers, that helps to properly deal with the request:
X-Real-IP: forwards the remote address to the upstream server, so it can know the real IP of the user. When nginx forwards the request to gunicorn, without this header, all gunicorn will know is that there is a request coming from localhost (or wherever the nginx server is), the remote address is always the IP address of the machine where nginx is running (who actually make the request to gunicorn)
Host: the Host header is forwarded so gunicorn can treat different requests for different hosts. Without this header, it will be impossible to Gunicorn to have these constraints
X-Forwarded-For: also known as XFF, this header provide more precise information about the real IP who makes the request. Imagine there are 10 proxies between the user machine and your webserver, the XFF header will all these proxies comma separated. In order to not turn a proxy into an anonymizer, it’s a good practice to always forward this header.
So that is it, in the next post we are going to install and run gunicorn. In other posts, we’ll see how to make automated deploys using Fabric, and some tricks on caching (using the proxy_cache directive and integrating Django, nginx and memcached).
See you in next posts.
Leia essa entrada em seu contexto original »
Speaking at PythonBrasil[7]
Publicado em 12/07/2012 às 0h43
Francisco Souza
Next weekend I’ll be talking about scaling Django applications at Python Brasil, the brazilian Python conference. It will be my first time at the conference, which is one of the greatest Python conferences in Latin America.
Some international dudes are also attending to the conference: Wesley Chun is going to talk about Python 3 and Google App Engine; Alan Runyan will talk about free and open source software, and Steve Holden will be talking about the issues involved in trying to build a global Python user group.
There is also Maciej Fijalkowski, PyPy core developer, talking about little things PyPy makes possible.
As I pointed before, I’m going to talk about scalability, based in some experiences aquired scaling Django applications at Globo.com, like G1, the greatest news portal in the Latin America.
Leia essa entrada em seu contexto original »
Splinter sprint on FISL
Publicado em 12/07/2012 às 0h16
Francisco Souza
We are going to start tomorrow, on FISL, another splinter sprint. “From June 29 through July 2, 2011, fisl12 will be hosted at the PUC Events Center, in Porto Alegre, Rio Grande do Sul, Brazil” (copied from FISL website). But don’t worry about the location: anyone in anywhere can join us in this sprint. There is an entry in splinter wiki about this sprint, and I’m just replicating the information here...
What is a splinter sprint?
Basically, a splinter sprint is an excuse for people to focus their undivided attention, for a set time frame, on improving splinter. It’s a focused, scheduled effort to fix bugs, add new features and improve documentation.
Anybody, anywhere around the world, can participate and contribute. If you’ve never contributed to splinter before, this is the perfect chance for you to chip in.
How to contribute
Choose an issue
Create a fork
Send a pull request
Remember: all new features should be well tested and documented. An issue can’t be closed if there isn’t docs for the solution code.
Preparing for the sprint
Get an IRC client, so that you can join us in the channel #cobrateam on Freenode.
See all you there!
Leia essa entrada em seu contexto original »
Splinter: Python tool for acceptance tests on web applications
Publicado em 11/07/2012 às 23h21
Francisco Souza
Capybara and Webrat are great Ruby tools for acceptance tests. A few months ago, we started a great tool for acceptance tests in Python web applications, called Splinter. There are many acceptance test tools on Python world: Selenium, Alfajor, Windmill, Mechanize, zope.testbrowser, etc. Splinter was not created to be another acceptance tool, but an abstract layer over other tools, its goal is provide a unique API that make acceptance testing easier and funnier.
In this post, I will show some basic usage of Splinter for simple web application tests. Splinter is a tool useful on tests of any web application. You can even test a Java web application using Splinter. This post example is a "test" of a Facebook feature, just because I want to focus on how to use Splinter, not on how to write a web application. The feature to be tested is the creation of an event (the Splinter sprint), following all the flow: first the user will login on Facebook, then click on "Events" menu item, then click on "Create an Event" button, enter all event informations and click on "Create event" button. So, let’s do it…
First step is create a Browser instance, which will provide method for interactions with browser (where the browser is: Firefox, Chrome, etc.). The code we need for it is very simple:
browser = Browser("firefox")
Browser is a class and its constructor receives the driver to be used with that instance. Nowadays, there are three drivers for Splinter: firefox, chrome and zope.testbrowser. We are using Firefox, and you can easily use Chrome by simply changing the driver from firefox to chrome. It’s also very simple to add another driver to Splinter, and I plan to cover how to do that in another blog post here.
A new browser session is started when we got the browser object, and this is the object used for Firefox interactions. Let's start a new event on Facebook, the Splinter Sprint. First of all, we need to visit the Facebook homepage. There is a visit method on Browser class, so we can use it:
browser.visit("https://www.facebook.com")
visit is a blocking operation: it waits for page to load, then we can navigate, click on links, fill forms, etc. Now we have Facebook homepage opened on browser, and you probably know that we need to login on Facebook page, but what if we are already logged in? So, let's create a method that login on Facebook with provided authentication data only the user is not logged in (imagine we are on a TestCase class):
What was made here? First of all, the method checks if there is an element present on the page, using a CSS selector. It checks for a div that contains the username and password fields. If that div is present, we tell the browser object to fill those fields, then find the submit button and click on it. The last line is an assert to guarantee that the login was successful and the current page is the Facebook homepage (by checking the presence of “Account” li).
We could also find elements by its texts, labels or whatever appears on screen, but remember: Facebook is an internationalized web application, and we can’t test it using only a specific language.
Okay, now we know how to visit a webpage, check if an element is present, fill a form and click on a button. We're also logged in on Facebook and can finally go ahead create the Splinter sprint event. So, here is the event creation flow, for a user:
On Facebook homepage, click on “Events” link, of left menu
The “Events” page will load, so click on “Create an Event” button
The user see a page with a form to create an event
Fill the date and chose the time
Define what is the name of the event, where it will happen and write a short description for it
Invite some guests
Upload a picture for the event
Click on “Create Event” button
We are going to do all these steps, except the 6th, because the Splinter Sprint will just be a public event and we don’t need to invite anybody. There are some boring AJAX requests on Facebook that we need to deal, so there is not only Splinter code for those steps above. First step is click on “Events” link. All we need to do is find the link and click on it:
The find_by_css method takes a CSS selector and returns an ElementList. So, we get the first element of the list (even when the selector returns only an element, the return type is still a list) and click on it. Like visit method, click is a blocking operation: the driver will only listen for new actions when the request is finished (the page is loaded).
We’re finally on "new event" page, and there is a form on screen waiting for data of the Splinter Sprint. Let’s fill the form. Here is the code for it:
browser.fill('event_startIntlDisplay', '5/21/2011')
browser.select('start_time_min', '480')
browser.fill('name', 'Splinter sprint')
browser.fill('location', 'Rio de Janeiro, Brazil')
browser.fill('desc', 'For more info, check out the #cobratem channel on freenode!')
That is it: the event is going to happen on May 21th 2011, at 8:00 in the morning (480 minutes). As we know, the event name is Splinter sprint, and we are going to join some guys down here in Brazil. We filled out the form using fill and select methods.
The fill method is used to fill a "fillable" field (a textarea, an input, etc.). It receives two strings: the first is the name of the field to fill and the second is the value that will fill the field. select is used to select an option in a select element (a “combo box”). It also receives two string parameters: the first is the name of the select element, and the second is the value of the option being selected.
Imagine you have the following select element:
To select “Male”, you would call the select method this way:
browser.select("gender", "m")
The last action before click on “Create Event” button is upload a picture for the event. On new event page, Facebook loads the file field for picture uploading inside an iframe, so we need to switch to this frame and interact with the form present inside the frame. To show the frame, we need to click on “Add Event Photo” button and then switch to it, we already know how click on a link:
When we click this link, Facebook makes an asynchronous request, which means the driver does not stay blocked waiting the end of the request, so if we try to interact with the frame BEFORE it appears, we will get an ElementDoesNotExist exception. Splinter provides the is_element_present method that receives an argument called wait_time, which is the time Splinter will wait for the element to appear on the screen. If the element does not appear on screen, we can’t go on, so we can assume the test failed (remember we are testing a Facebook feature):
if not browser.is_element_present_by_css('iframe#upload_pic_frame', wait_time=10):
fail("The upload pic iframe did'n't appear :(")
The is_element_present_by_css method takes a CSS selector and tries to find an element using it. It also receives a wait_time parameter that indicates a time out for the search of the element. So, if the iframe element with ID=”upload_pic_frame” is not present or doesn’t appear in the screen after 10 seconds, the method returns False, otherwise it returns True.
Important:fail is a pseudocode sample and doesn’t exist (if you’re using unittest library, you can invoke self.fail in a TestCase, exactly what I did in complete snippet for this example, available at Github).
Now we see the iframe element on screen and we can finally upload the picture. Imagine we have a variable that contains the path of the picture (and not a file object, StringIO, or something like this), and this variable name is picture_path, this is the code we need:
with browser.get_iframe('upload_pic_frame') as frame:
    frame.attach_file('pic', picture_path)
    time.sleep(10)
Splinter provides the get_iframe method that changes the context and returns another objet to interact with the content of the frame. So we call the attach_file method, who also receives two strings: the first is the name of the input element and the second is the absolute path to the file being sent. Facebook also uploads the picture asynchronously, but there’s no way to wait some element to appear on screen, so I just put Python to sleep 10 seconds on last line.
After finish all these steps, we can finally click on “Create Event” button and asserts that Facebook created it:
browser.find_by_css('label.uiButton input[type="submit"]').first.click()
title = browser.find_by_css('h1 span').first.text
assert title == 'Splinter sprint'
After create an event, Facebook redirects the browser to the event page, so we can check if it really happened by asserting the header of the page. That’s what the code above does: in the new event page, it click on submit button, and after the redirect, get the text of a span element and asserts that this text equals to “Splinter sprint”.
That is it! This post was an overview on Splinter API. Check out the complete snippet, written as a test case and also check out Splinter repository at Github.
Leia essa entrada em seu contexto original »
Flying with Django on Google App Engine
Publicado em 11/07/2012 às 20h24
Francisco Souza
Google App Engine is a powerful tool for web developers. I am sure that it is useful and every developer should taste it =) Python was the first programming language supported by App Engine, and is a programming language with a lot of web frameworks. So, you can use some of these frameworks on Google App Engine. In a series of three blog posts, I will show how to use three Python web frameworks on App Engine: Django, Flask and web2py (not necessarily in this order).
The first framework is Django, the most famous of all Python frameworks and maybe is used the most.
Django models is the strongest Django feature. It is a high level database abstraction layer with a powerful object-relational mapper, it supports a lot of relational database management systems, but App Engine doesn’t use a relational database. The database behind App Engine is called BigTable, which is a distributed storage system for managing structured data, designed to scale to a very large size (Reference: Bigtable: A Distributed Storage System for Structured Data). It is not based on schemas, tables, keys or columns, it is like a big map indexed by a row key, column key and a timestamp. We can not use native version of Django models with Bigtable, because the Django models framework was not designed for non relational databases.
So, what can we do? There is a Django fork, the django-nonrel project, which aims to bring the power of the Django model layer to non-relational databases. I will use the djangoappengine sub-project to build the sample application of this post, that will be deployed on Google App Engine :)
The sample application is the default: a blog. A very simple blog, with only a form protected by login (using Django built-in authentication system instead of Google Accounts API) and a public page listing all blog posts. It is very easy and simple to do, so let’s do it.
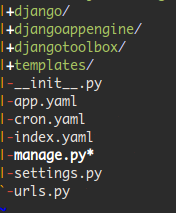
First, we have to setup our environment. According the djangoappengine project documentation, we need to download 4 zip files and put it together. First, I downloaded the django-testapp file, extract its contents and renamed the project directory from django-testapp to blog_gae. After this step, I downloaded the other files and put it inside the blog_gae directory. Here is the final project structure:
“django” directory is from the django-nonrel zip file, “djangoappengine” directory is from djangoappengine zip file and “djangotoolbox” directory is from djangotoolbox zip file. Look that is provided an app.yaml file, ready to be customized. I just changed the application id inside this file. The final code of the file is the following:
I will use one version for each part of the series, so it is the first version because it is the first part =D In settings.py, we just uncomment the app django.contrib.auth line inside the INSTALLED_APPS tuple, because we want to use the built-in auth application instead of the Google Accounts API provided by App Engine.
All settings are ok now, it is time to create the core application. In the Django project, we will use the core application to manage models and serve some views. We just start it using the following command:
% python manage.py startapp core
It is a famous Django command, that creates the application structure, which is a Python package containing 3 Python modules: models, tests and views. Now we have to create the Post model. Here is the code of models.py file:
from django.db import models
from django.contrib.auth.models import User

class Post(models.Model):
    title = models.CharField(max_length = 200)
    content = models.TextField()
    date = models.DateTimeField(auto_now_add = True)
    user = models.ForeignKey(User)
Now we just need to “install” the core application putting it on INSTALLED_APPS tuple in settings.py file and Django will be ready to play with BigTable. :) We will use the django.contrib.auth app, so let’s run a manage command to create a superuser:
% python manage.py createsuperuser
After create the superuser, we need to setup login and logout URLs, and make two templates. So, in urls.py file, put two mappings to login and logout views. The file will look like this:
And we are ready to code =) Let’s create the login protected view, where we will write and save a new post. To do that, first we need to create a Django Form, to deal with the data. There are two fields in this form: title and content, when the form is submitted, the user property is filled with the current logged user and the date property is filled with the current time. So, here is the code of the ModelForm:
class PostForm(forms.ModelForm):
    class Meta:
        model = Post
        exclude = ('user',)

    def save(self, user, commit = True):
        post = super(PostForm, self).save(commit = False)
        post.user = user

        if commit:
            post.save()

        return post
Here is the views.py file, with the two views (one “mocked up”, with a simple redirect):
from django.contrib.auth.decorators import login_required from django.shortcuts import render_to_response from django.template import RequestContext from django.http import HttpResponseRedirect from django.core.urlresolvers import reverse from forms import PostForm
def new_post(request): form = PostForm() if request.method == 'POST': form = PostForm(request.POST) if form.is_valid(): form.save(request.user) return HttpResponseRedirect(reverse('core.views.list_posts')) return render_to_response('new_post.html', locals(), context_instance=RequestContext(request) )
There is only two steps to do to finally save posts on BigTable: map a URL for the views above and create the new_post.html template. Here is the mapping code:
{% endblock %}Now, we can run on terminal ./manage.py runserver and access the URL http://localhost:8000/posts/new on the browser, see the form, fill it and save the post :D The last one step is list all posts in http://localhost:8000/posts/. The list_posts view is already mapped to the URL /posts/, so we just need to create the code of the view and a template to show the list of posts. Here is the view code:
{{ post.title }} (written by {{ post.user.username }})
{{ post.content }}
{% endfor %}
{% endblock %}Finished? Not yet :) The application now is ready to deploy. How do we deploy it? Just one command:
% python manage.py deploy
Done! Now, to use everything that we have just created on App Engine remote server, just create a super user in that server and enjoy:
% python manage.py remote createsuperuser
You can check this application flying on Google App Engine: http://1.latest.gaeseries.appspot.com (use demo for username and password in login page).
You can check this application code out in Github: http://github.com/fsouza/gaeseries/tree/django.
Leia essa entrada em seu contexto original »
Don’t rely on caching
Publicado em 09/07/2012 às 21h16
Francisco Souza
Extracted from Django docs: “memory isn’t intended for permanent data storage, so don’t rely on memory-based caching as your only data storage. Without a doubt, none of the Django caching backends should be used for permanent storage”.
Here is the lesson: don’t rely on caching. Cache doesn’t exist to make applications work, it exists to make them faster and/or more scalable. Use a cache system as permanent storage is such a bad idea, except when you’re not using it for caching (what is not the case here). Cache is a shortcut for a path that might be painful to follow, but you still should not rely on cache. You must be able to traverse the path without the cache.
Leia essa entrada em seu contexto original »
Fazendo deployment de sua aplicação em Django, Flask e afins com uWSGI e nginx
Publicado em 28/10/2011 às 22h15
Jayson Santos
Por que usar o uWSGI? Porque atualmente é a opção mais performática e linda de fazer deloyment de projetos em Python, tanto faz se sua aplicação é escrita usando Django, Flask ou afins.
Levando em conta que você já tenha o nginx instalado, falarei apenas sobre a parte que envolve o uWSGI.
Primeiros passos:
Primeiro instale os headers da libxml2 e do python, no ubuntu por exemplo, digite apenas: sudo apt-get install libxml2-dev python-dev.
Com o PIP, instale o uWSGI: sudo pip install uWSGI. O PIP começará a compilar o uWSGI, caso você não tenha GCC, make, autoconf e etc, instale com sudo apt-get install build-essential.
Eu particularmente, escrevo as configurações para o uWSGI em arquivos INI, segue uma configuração que geralmente uso.
              [uwsgi]

              touch-reload=/diretorio/projeto/tmp/restart.txt # Usado para que o uWSGI recarrege o seu fonte com um simples touch restart.txt

              listen=1024 # Número de itens em fila de espera

              disable-logging=true # Deixa de logar requisições, fará log apenas de erros.

              socket=/diretorio/que/voce/quiser.sock # Caminho do socket que o uWSGI ouvirá/escreverá.

              master=true # Ativa o processo master para controlar os rebeldes.

              harakiri=60 # Modo suicida que matará a app após x segundos em execução.

              processes=4 # Número de workers.

              buffer-size=25000 # Buffer mais alto porque muitas vezes alguns browsers mandam headers gigantes.

              daemonize=/diretorio/que/voce/quiser.log # Joga o processo para background e escreve o log no arquivo determinado.

              post-buffering=8192 # Limite máximo de tamanho do body do http, passando o limite, ele salva em disco.

              pidfile=/diretorio/que/voce/quiser.pid # Arquivo que o número do processo master será gravado.

              pythonpath=/diretorio/do/seu/projeto

              module=wsgi # Módulo que o uWSGI carregará a sua app.
Com isso, sua app já deve funcionar com uwsgi --ini /arquivo/ini.ini.
Para fazer o deployment com o nginx, você precisa de duas linhas apenas.
No seu location / adicione:
include uwsgi_params;
uwsgi_pass unix:/diretorio/do/socket.sock;
Pronto, depolyment feito, não se esqueça de colocar o nginx para servir seus estáticos senão será um tiro no pé usar o uWSGI para isso.
- Wait!!! Como faz para fazer o uWSGI iniciar com a máquina?
- One word: upstart.
- Tá! Como?
- Mais fácil do que tirar doce de criança.
Crie um arquivo .conf em /etc/init com o seguinte conteúdo:
              start on (net-device-up

              and local-filesystems

              and runlevel [2345])

              stop on runlevel [016]

              respawn

              expect daemon

              exec uwsgi --ini /seu/arquivo/de/config/uwsgi.ini
Para executar a app, digite start nome_do_arquivo sem o .conf é claro. Outros comandos são: stop, restart e status.
Pronto, espero que tenham gostado/achado útil, qualquer dúvida, comentem ou twittem para .
Leia essa entrada em seu contexto original »
Usando o uWSGI para enfileirar seus e-mails com Django
Publicado em 20/10/2011 às 0h55
Jayson Santos
Acredito que muitas pessoas já tiveram a necessidade de enfileirar o envio de e-mails para que o usuário não espere a boa vontade do servidor SMTP e afins. Para isso, desenvolvi um backend para envio de e-mails em Django que usa o Spooler do uWSGI para fazer a bendita fila.
Para quem não conhece o Spooler do uWSGI, a documentação completa pode ser consultada em http://projects.unbit.it/uwsgi/wiki/Spooler, e os lindos decorators, podem ser consultados em http://projects.unbit.it/uwsgi/wiki/Decorators.
Vamos ao que interessa.
Para instalar, pip install django-uwsgi-mail ou baixe o repositório em https://github.com/jaysonsantos/django-uwsgi-mail.
Para usá-lo, adicione o uwsgi_mail ao seu python path, e configure no seu settings o backend de e-mail com EMAIL_BACKEND = 'uwsgi_mail.uwsgi.EmailBackend', não esquecendo de ativar o spooler no seu uWSGI e fazer com que ele carrege o módulo uwsgi_mail.task.
- Que mais, tio?
- Nada, envie seus e-mails.
- Como assim?
- Com o backend adicionado, você pode usar tanto o send_mail ou EmailMessage normalmente que o backend irá serializar a mensagem e enviar para o uWSGI que enviará para o spool e o spool voltará ao uwsgi_mail.task.send_mail que usará por padrão o backend de SMTP do Django, caso você queria alterá-lo, no seu settings, configure UWSGI_EMAIL_BACKEND com o backend que você quiser.
É isso aí, façam fork do projeto, modifiquem, comentem.
Mais informaçõs em https://github.com/jaysonsantos/django-uwsgi-mail.
Leia essa entrada em seu contexto original »
Hospedado por APyB. Django Brasil é a comunidade brasileira de usuários do framework web Django. Django é uma marca registrada de Lawrence Journal-World.
 Next weekend I’ll be talking about scaling Django applications at Python Brasil, the brazilian Python conference. It will be my first time at the conference, which is one of the greatest Python conferences in Latin America.
 Capybara and Webrat are great Ruby tools for acceptance tests. A few months ago, we started a great tool for acceptance tests in Python web applications, called Splinter. There are many acceptance test tools on Python world: Selenium, Alfajor, Windmill, Mechanize, zope.testbrowser, etc. Splinter was not created to be another acceptance tool, but an abstract layer over other tools, its goal is provide a unique API that make acceptance testing easier and funnier.